FFmpeg Installation is quite simple:
- Navigate to the FFmpeg Download Website, and Download the latest "Static Build" release to your PC.
- To make this even simpler, you can directly download one of the following static builds from here (both work fine):
- Use a program like 7-Zip to Extract the .tar.xz file (and Extract again for the resulting .tar file) on your PC.
- Open the resulting folder, and find the file named "ffmpeg".
- Connect to your Server as the root user via SFTP, via an FTP client (like FileZilla or Bitvise).
- E.g., in FileZilla, simply enter your Host (IP), SSH/SFTP Username (root), SSH/SFTP Password (your root user password), and Port (usually 22), as follows:

- Then click "Quickconnect".
- E.g., in FileZilla, simply enter your Host (IP), SSH/SFTP Username (root), SSH/SFTP Password (your root user password), and Port (usually 22), as follows:
- Navigate to /usr/bin or /usr/local/bin (or any other directory with sufficient privileges) and upload the "ffmpeg" file to your server.
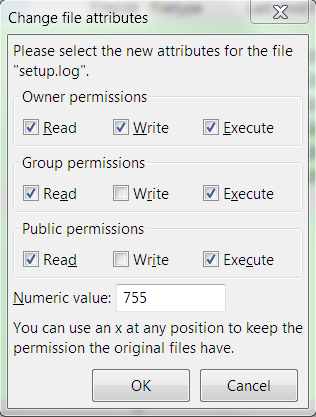
- Change CHMOD (permissions) of "ffmpeg" file to 755.
- In Filezilla, right click on the "ffmpeg" file after uploading it, Select "File permissions...", and configure the resulting dialogue like so:

- Click the OK button.
- In Filezilla, right click on the "ffmpeg" file after uploading it, Select "File permissions...", and configure the resulting dialogue like so:
- In our products, in the corresponding Config file, update a constant named "FFMPEG" (or one similarly named) with the full, absolute path to FFmpeg, e.g.:
- /usr/bin/ffmpeg
- /usr/local/bin/ffmpeg
- /full/path/to/ffmpeg (in general)
That's it!
You're done!

